
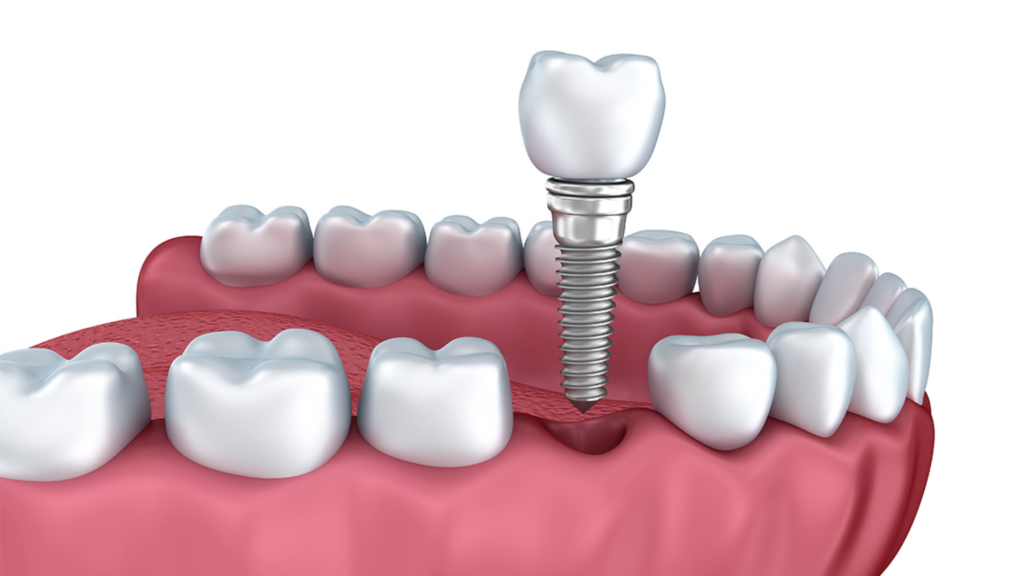
If you’ve decided to get dental implants or you’re seriously considering them, the next question is almost always the same: “What actually happens?”
The honest answer is that the procedure is more involved than a filling and significantly less involved than most patients expect. It’s spread across multiple visits over 3–6 months for a single implant, or compressed into a single surgical day for All-on-4. The visits themselves are routine; what makes the process feel long is the healing time between them.
This is a clear walkthrough of every step, from the day you first call about a consultation to the day your final crown is delivered, written by Dr. Rushabh Doshi at SmileOn Dental Implants, who has performed this exact sequence over 5,000 times.
The Procedure at a Glance
| Stage | Visit | Time at Office | Time From Start |
|---|---|---|---|
| 1 | Consultation + 3D scan | 45–60 min | Day 0 |
| 2 | Treatment planning review | 15–30 min | Day 7–14 (often combined with Stage 1) |
| 3 | Extractions/bone grafting (if needed) | 30–90 min | Day 14–30 |
| 4 | Implant placement surgery | 60–120 min | Day 30–120 |
| 5 | Osseointegration (healing) | n/a at home | 3–6 months |
| 6 | Abutment placement | 30 min | Month 4–6 |
| 7 | Crown impression / digital scan | 30 min | Month 4–6 |
| 8 | Final crown delivery | 45 min | Month 4–6 |
Six to eight visits over 4–6 months for a single implant. For All-on-4, the sequence compresses dramatically. Stages 3–6 collapse into a single surgical day. We’ll cover both.
Stage 1: The Consultation
This is where everything starts. The consultation at SmileOn takes 45–60 minutes and is complimentary for new implant patients.
What Happens at the Visit
You’ll be greeted at the front desk, asked to complete a brief health-history questionnaire (most patients do this online ahead of time to save time), and brought back to an exam room. Dr. Doshi will:
- Review your health history in detail, current medications, chronic conditions, allergies, past dental work, and smoking status
- Examine your mouth, clinically visible teeth, gums, soft tissues, bite, and jaw movement
- Take a 3D cone-beam CT scan, this is the diagnostic centerpiece, showing your bone volume, density, sinus position, and nerve location with millimeter precision
- Walk you through what’s possible based on the scan and exam, what implant treatments are realistic for your case, what the timeline looks like, and what the cost would be
- Answer everything you ask, no time limit, no rush
What You Leave With
- A written treatment plan
- An itemized cost quote
- Insurance verification (if applicable)
- Financing pre-qualification (5-minute soft credit check across all four providers)
- A clear understanding of your timeline
- Zero obligation to schedule treatment that day
If the case is straightforward, single implant, healthy bone, and no extractions needed, many patients schedule the surgical visit before leaving the consultation. For more complex cases, Dr. Doshi may want a day or two to finalize the surgical plan before booking.
Stage 2: Treatment Planning
For most single-implant cases, Stage 2 is folded into Stage 1. Dr. Doshi reviews the scan with you in real time during your consultation, and you leave with the plan.
For more complex cases (All-on-4, full-mouth, significant grafting), there’s usually a separate planning step where:
- The 3D scan is used to create a virtual surgical plan
- A surgical guide may be 3D-printed for precise implant positioning
- Lab work is initiated for any temporary or final restorations
- The full surgical sequence is mapped out
This stage happens behind the scenes for the most part. You may or may not have a second visit during this phase, depending on complexity.
Stage 3: Preparation (Extractions and Bone Grafting, If Needed)
Not every patient needs this stage. Two scenarios where it applies:
If the Tooth Being Replaced Is Still in the Mouth
The failing or damaged tooth needs to be extracted before (or at the same time as) the implant placement. For a simple extraction, this is a 15–30 minute procedure with local anesthesia. Recovery is typically 3–5 days of mild discomfort.
In many cases, we perform immediate placement, extracting the tooth and placing the implant in the same socket during the same visit. This saves time and preserves more bone. About 60% of single-tooth cases qualify for immediate placement.
If Bone Grafting Is Needed
A bone graft adds bone material to a site that has lost volume. The need is determined by the 3D scan during Stage 1. Three common scenarios:
| Graft Type | Description | Time | Cost |
|---|---|---|---|
| Socket preservation graft | Placed at the time of an extraction to maintain the ridge for a future implant | 15-minute add-on to extraction visit | $300–$600 |
| Standard bone graft | Placed at the implant site before or with the implant | 30–45 min | $600–$1,200 (3–6 months healing if done separately) |
| Sinus lift | For upper-jaw implants where the sinus floor is too low | 45–60 min | $1,500–$2,500 (may be combined with implant placement or done separately) |
For All-on-4, the procedure is specifically designed to avoid most grafting by using angled implants that engage the available bone one reason it’s possible for many patients who’d been told they weren’t implant candidates elsewhere.
Stage 4: Implant Placement Surgery
This is the visit most patients are most anxious about. The good news: it’s significantly less intense than the anxiety predicts. Most single-implant patients describe it as “easier than the tooth extraction I had years ago.”
Before the Surgery
- You’ll arrive, check in, and be brought to the surgical room
- Vital signs are taken
- If you’re having sedation, the IV is started, and sedation begins (you become drowsy and won’t remember much of the procedure)
- If you’re having local anesthesia only, a numbing gel is applied, followed by the local anesthetic injection the only part most patients actually feel, and it’s brief
During the Surgery (60–90 Minutes for a Single Implant)
- The surgical site is cleaned and isolated with a sterile drape
- A small incision is made in the gum to expose the bone (1–2 cm)
- A precise hole is drilled in the bone at the planned implant site, using a surgical guide for accuracy
- The titanium implant fixture is threaded into the prepared hole and tightened to a specific torque value
- A healing cap or cover screw is placed on top of the implant
- The gum is sutured closed
- A short final check confirms everything is positioned correctly
For All-on-4, the Surgical Day Is Longer (3–5 Hours)
- Any remaining failing teeth in that arch are extracted
- 4 implants are placed, typically 2 at the front (straight) and 2 at the back (angled)
- Multi-unit abutments are connected to the implants
- A pre-fabricated temporary bridge is screwed into place
- You walk out with a complete set of fixed teeth on that arch
After the Surgery
You’ll spend 15–30 minutes in a recovery area. If you had IV sedation, you’ll need a driver to take you home. You’ll be given:
- Written post-op instructions
- Prescription pain medication (typically a few days’ worth)
- Antibiotics if indicated
- Sometimes an antibacterial mouthwash
- A follow-up appointment is scheduled 7–10 days out
Most patients return to non-physical work within 24–48 hours for a single implant. For All-on-4, plan for 3–5 days of recovery before returning to most activities, and 7–10 days before any physical exertion.
Stage 5: Osseointegration (Healing)
This is the longest stage, 3–6 months, and it happens entirely at home. During this period, the bone grows around and bonds to the surface of the implant, locking it permanently in place. This is what makes a dental implant function like a natural tooth root rather than a screw sitting in bone.
What You Do During This Time
For single implants:
- Brush and floss normally elsewhere; gentle around the implant site for the first 2 weeks
- Use the prescribed mouthwash for 7–14 days
- Avoid hard or chewy foods at the implant site for 4–6 weeks
- Don’t smoke (smoking dramatically reduces success rates during healing)
- Attend a follow-up visit at week 1–2 and again at month 3
- Otherwise: live your normal life
For All-on-4:
- You’re eating with your temporary fixed bridge from day 1, with a soft-food diet for the first 6–8 weeks
- Gradually return to firmer foods as comfort allows
- Brush and use a water flosser around the bridge
- Follow-up visits at week 1, month 1, and month 3
- The temporary bridge stays in place until the final permanent bridge is ready
What’s Happening Biologically
In the first 2 weeks, soft tissue heals around the implant. Over the following 3–6 months, microscopic bone cells grow into and around the titanium surface, creating a permanent bond. This is why patience during this phase matters; putting heavy forces on the implant too early can prevent the bond from forming properly.
For most patients, this stage is uneventful and easy to forget about. You go about your life. The implant is doing its work underneath the gum.
Stage 6: Abutment Placement
After healing is complete, the next visit is the abutment placement. This is the connector piece that sits between the implant (underneath the gum) and the crown (above the gum).
- Two-stage approach (gum was closed over the implant during Stage 4): A small incision is made to expose the top of the implant, the cover screw is removed, and the abutment is attached. The gum heals around the abutment over the next 2–3 weeks, forming a natural-looking cuff.
- One-stage approach (a healing cap was placed above the gum during Stage 4): The cap is simply removed, and the abutment is attached.
Either way, this visit takes about 30 minutes. There may be a few days of mild gum discomfort afterward, but recovery is much shorter than after Stage 4.
For All-on-4: abutments were placed during the surgical day, so this stage is skipped.
Stage 7: Crown Impression / Digital Scan
About 2–3 weeks after the abutment is in place and the gum has fully formed around it, you’ll come in for an impression visit. This is when we capture the exact shape needed for your custom crown.
Modern practice (and standard at SmileOn) is digital scanning, where a small handheld camera takes hundreds of images of your bite, the abutment, and the adjacent teeth, building a 3D model in real time. No traditional putty impressions, no gagging, no waiting for materials to set.
The digital file is sent to the dental lab, where your custom crown is milled from zirconia (or your chosen material) over the following 2 weeks.
For All-on-4: the final permanent zirconia bridge follows a similar process scanned, designed, and milled but on a longer cycle (3–6 weeks) because of the complexity.
Stage 8: Final Crown Delivery
This is the last visit. The custom crown is screwed or cemented to the abutment, your bite is checked and adjusted if needed, and you’re done.
For single implants, this visit takes 45–60 minutes. You leave with a fully functional new tooth that looks, feels, and acts like the rest of your teeth.
For All-on-4, the final visit involves swapping out the temporary bridge for the permanent zirconia bridge. The fit is verified, the bite is balanced, and the bridge is secured. This visit can run 60–90 minutes.
Long-Term Care
Once your implant is restored, the maintenance is essentially the same as for a natural tooth:
- Brush twice daily (an electric toothbrush is preferred)
- Floss daily (or use a water flosser, especially for All-on-4)
- Professional cleanings every 6 months
- An annual check on the implant area
- Don’t use teeth as tools, don’t chew ice, don’t grind (a nightguard if you grind)
A well-cared-for implant typically lasts 20+ years. Many last a lifetime.
How the Procedure Differs by Case Type
Single Tooth Implant (Most Common)
- Total timeline: 3–6 months
- Visits: 4–6
- Cost: $4,000–$6,500 complete
Multiple Separate Implants (2–4 Missing Teeth in Different Spots)
- Same procedure per tooth, often consolidated into fewer visits
- Total timeline: 3–6 months
- Cost: similar per implant, sometimes with package pricing
Implant-Supported Bridge (3–4 Teeth in a Row, 2 Implants Supporting a Bridge)
- Slightly longer per-implant surgical time
- Total timeline: 3–6 months
- Cost: less per tooth than individual implants
All-on-4 (Full Arch, 4 Implants + Permanent Bridge)
- Surgical day: 3–5 hours, all in one visit
- Final bridge: 3–6 months later
- Total timeline: 4–6 months
- Cost: $24,000 per arch
- Walking out with teeth on day one
Snap-On Implant Denture (4 Implants + Removable Overdenture)
- Similar timeline to All-on-4
- Removable denture instead of a permanent bridge
- Cost: $9,000 per arch
Frequently Asked Questions
How long does the whole implant process take from start to finish? For a single implant: 3–6 months from consultation to final crown. For All-on-4: same surgical day for the temporary bridge; 3–6 months for the final permanent bridge.
Will I have a gap in my teeth during healing? Usually no. For a visible front tooth, we provide a temporary tooth (often a “flipper” or temporary crown) during the healing period so you’re never walking around with a space. For back teeth, many patients choose to heal without a temporary since the gap isn’t visible your choice.
Can I eat normally during the healing period? For the first 4–6 weeks, soft foods are eaten at the implant site. After that, gradually return to normal eating, avoiding hard items directly on the implant area until it’s fully restored.
What if the implant fails? Implant failure occurs in roughly 3% of cases. When it does, the implant is typically removed, the site is allowed to heal for 3–4 months, and a new implant is placed. SmileOn warrants the surgical placement; if an implant fails within the warranty period, the replacement is provided without additional fixture cost.
Can I have multiple implants done at the same time? Yes, and it often makes sense for cost and recovery. Two implants placed in the same surgical visit involve only one round of sedation, one round of anesthesia, and a shared recovery. Many practices offer package pricing for 2+ implants done together.
Do I need someone to drive me home? For local anesthesia only, most patients drive themselves. For sedation (oral or IV), yes, you need a driver. For All-on-4 with IV sedation, definitely.
How soon after losing a tooth should I get an implant? Sooner is better. Bone loss begins immediately and accelerates in the first year. In many cases, we can place the implant at the same time as the extraction (immediate placement). If you can’t or don’t want immediate placement, a socket preservation graft at the extraction visit can keep your options open.
What about pain? How bad is it really? For most single-implant patients, prescription pain medication is needed for the first 24–48 hours, and over-the-counter Tylenol/Advil is sufficient after that. Most patients describe the discomfort as less than they expected, closer to a wisdom tooth extraction than a “surgery.” We cover pain expectations in detail in our Do Dental Implants Hurt? guide.
Schedule Your Free Consultation
The procedure itself is well-understood, well-practiced, and routinely uneventful. The hardest part is the decision to start.
A free consultation with Dr. Doshi takes 45–60 minutes and gives you a complete picture of what your specific case looks like, timeline, cost, recovery, and outcome. No obligation.
Dr. Doshi practices across three DFW locations:
- Mansfield – 360 Dental Lounge
- Arlington – Arlington Dental Lounge
- Irving – Irving Family Dental
Call (682) 563-5663 or schedule online.
Consultation is complimentary for new patients. Treatment plan recommendations require diagnostic evaluation, including imaging. Not applicable to patients with active, untreated periodontal disease. Cannot be combined with insurance. Subject to clinical eligibility.